PDF Document Maker - User Guide
Version: 1.0.1
Publication Date: January 27, 2025
Written by: David Herron
Home page: https://akashacms.github.io/pdf-document-construction-set/index.html
PDF Document Maker is a comprehensive tool for producing good quality PDFs from Markdown or AsciiDoc files.
The goal is producing documents with similar fidelity to those produced from WYSIWYG word processors, from files which are easily versioned in normal source code control systems (like Git). A secondary goal is the ability to easily use the same content, as normal HTML pages, on a website.
The features include
- Many Markdown extensions adding useful capaibilities
- Formatting templates covering both page layout and custom HTML snippets
- Using multiple CSS stylesheets to customize the look. The tool comes with one stylesheet designed specifically for printable documents
- Both custom DOM processing and custom HTML elements, supporting custom design elements, and even bringing in external data
- Built on top of AkashaCMS, a mature system that's designed for producing static HTML websites and E-Books.
- HTML intermediary files are converted to PDF using Puppeteer
All this is bundled into one easy-to-use command-line application offering a lot of flexibility.
This document
- Documents PDF Document Maker usage
- Serves as an example document rendered to PDF using PDF Document Maker
- Serves as a testbed for PDF Document Maker features
- Demonstrates reusing the same content between PDF and Website
This document is rendered from a project directory in the GitHub repository: https://github.com/akashacms/pdf-document-construction-set/tree/main/guide
Installation and Project setup for PDF Document Maker
PDF Document Maker runs on the Node.js platform, and is tested with Node.js v20. It should work for later releases.
A project directory consists of a package.json file which is used for listing dependencies and build processes. Instead of being used for building Node.js packages, we will use it to record project dependencies and for build scripts.
$ node --version  # Make sure v20 or later
$ npm init -y     # Set up a default package.json
$ npm install @akashacms/pdf-document-maker --save
Once installed you can get help:
$ npx pdf-document-maker --help
Usage: pdf-document-maker [options] <docPath>

CLI to build PDF files from Markdown/AsciiDoc documents
  # ...
  -h, --help                        display help for command
The application has a lot of options. But, most of them have reasonable defaults, and typically you'll use only a few.
Quick start for using PDF Document Maker
Before going deep into using PDF Document Maker, let's do a quick and easy example. We will format a test file into a PDF.
The search phrase "standard markdown test file" turns up several test Markdown files. This repository has a very good one: https://github.com/mxstbr/markdown-test-file
Start by creating a directory, adding a package.json, and installing @akashacms/pdf-document-maker as shown above.
The GitHub repository for this tool already has this set up in https://github.com/akashacms/pdf-document-construction-set/tree/main/example/simple
In that directory, create a directory named documents:
$ mkdir documents
$ cd documents
$ wget https://...   # Download TEST.md
$ cd ..
With a file, documents/TEST.md, run this command:
$ npx pdf-document-maker  \
        --document-dir documents \
        --pdf-output PDF \
        --html-output out \
        --title 'Markdown test document' \
        --format A4 \
        TEST.md
This command creates two files:
out/TEST.html- is the HTML intermediate filePDF/TEST.pdf- is the PDF result
What did that command do?
A lot happened under the covers:
- A configuration object was built for rendering documents into an HTML output directory.
- The input file was processed and written to the output, as were any assets (CSS etc).
- This created
out/TEST.html
- This created
- Puppeteer was invoked to print the HTML to PDF.
- This created
PDF/TEST.pdf
- This created
This is approximately what happened:
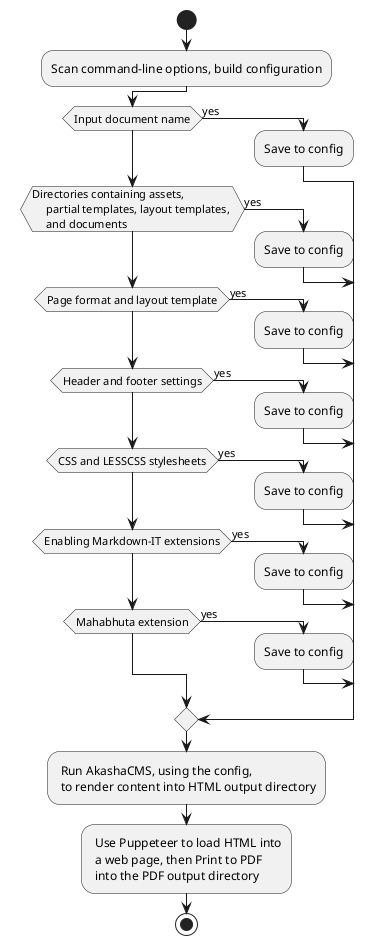
This diagram is itself an example of what's possible. This is a UML Activity Diagram describing a high-level overview of PDF Document Maker's internal implementation. The diagram is described in-line with the text, then formatted using PlantUML into a PNG.
This diagram names four kinds of directories. This comes from the underlying system, AkashaCMS, which supports four sets of input directories, assets, partials, layouts, and documents with these purposes.
| Type | Option | Description |
|---|---|---|
| assets | --asset-dir |
Holds unprocessed files like CSS or images |
| partials | --partial-dir |
Holds templates for content snippets |
| layouts | --layout-dir |
Holds page layout templates |
| documents | --document-dir |
Holds document files |
For of the directory types there may be multiple actual directories. The directories are stacked with the later directories being higher in the stack. This forms four virtual filesystems and we refer to files using the relative pathname from the root.
In this example there is one documents directory. The file TEST.md was placed in that directory, giving it the file-system path documents/TEST.md. Because it is a file in a documents directory, it has a VPath (Virtual Path) of TEST.md which is the path we use on the command line.
No page layout template was named on the command-line. Within PDF Document Maker there is a layouts directory holding a single layout template, default.njk, which is used by default if no layout template is specified.
By default a print-oriented CSS stylesheet is used.
Look in the directory out and you'll find several files including TEST.html, which was rendered from TEST.md.
File name conventions
We already discussed how the virtual directory stack works, and that a VPath is a path name relative to the root directory(ies).
The file names in documents, partials, and layouts directories have file extensions naming the file type. The extension is used to select the rendering package required to process that file.
| Name | Extension | Output Ext | Description |
|---|---|---|---|
| AsciiDoc | .adoc or .html.adoc |
.html |
Supports AsciiDoctor documents |
| Markdown | .md or .html.md |
.html |
Supports Markdown documents |
| LESS | .less or .css.less |
.css |
Supports compiling LESS files to CSS |
| EJS | .ejs or .html.ejs |
.html |
EJS |
| Handlebars | .handlebars or .html.handlebars |
.html |
Handlebars |
| JSON | .json or .html.json |
.html |
Supports rendering a JSON document through a template to produce HTML |
| Liquid | .liquid or .html.liquid |
.html |
LiquidJS |
| Nunjucks | .njk or .html.njk |
.html |
Nunjucks |
In documents directories, files with these extensions are processed by the named rendering engine, then placed in the same VPath (with the new extension) in the HTML output directory.
In partials or layouts directories, files have either extension, and are used while rendering files in the documents directories. These files are not copied to the HTML output directory.
In assets directories, files are simply copied to the HTML output directory.
Page layouts
Layout templates are responsible for establishing the entire page structure.
The HTML resulting from rendering the Markdown or AsciiDoc is available to the layout template as a variable named content.
Consider the default layout template, default.njk:
Figure 1. The default page layout template
<!doctype html>
<html lang="en">
<head>
<meta charset="utf-8" />
<meta http-equiv="X-UA-Compatible" content="IE=edge,chrome=1" />
<meta name="viewport" content="width=device-width, initial-scale=1.0"/>

{% import "ak_core_macros.njk" as ak_core with context %}
{% import "ak_base_macros.njk" as ak_base with context %}

<title>{{ title }}</title>
{{ ak_core.stylesheets() }}
{{ ak_core.headerJavaScript() }}
</head>
<body>
<div class="container-fluid" role="main">
<div class="row">
  <!-- include our document's content -->
  <article class="col-md-9">
      <h1>{{ title }}</h1>
      {{ content }}
  </article>
</div>
{{ ak_core.footerJavaScript() }}
</body>
</html>
This template is derived from ones used for regular websites. It is in Nunjucks format.
It imports Nunjucks macros from the AkashaCMS built-in and base plugins. For example, the AkashaCMS configuration includes a list of stylesheet and JavaScript files. The macros shown here format those lists into appropriate <link> and <script> tags.
Bootstrap classes are used to aid page layout, but can be used for other purposes. For example, the default.njk layout template just above was wrapped in a Bootstrap Card component.
As said earlier, the content from the previous rendering stage is available as the variable content. The page title is also available as a variable named title.
Partial templates
Partials are typically a small template meant to help format commonly used HTML structures.
For example, each document might have a metadata field (we'll discuss this later) named publicationDate which you might want to present somewhere. In the AkashaCMS Base plugin, the partial ak_publdate.html.njk is available for this purpose (in NJK format):
Figure 2. Displaying a publication date
{% if publicationDate %}
    Date: {{ publicationDate | escape }}
{% endif %}
This can be invoked by the custom tag
Figure 3. Using the <partial> tag
<partial file-name="ak_publdate.html.njk" data-publication-date="Date String"/>
There are other methods such as the <publication-date> tag, or the akpublicationdate extension installed in Nunjucks, both of which invoke this same partial template.
Document format, and document metadata
We've already discussed three items that are contained in document metadata.
Like many systems, the document format supports YAML frontmatter which turns into the document metadata.
It looks roughly like this:
Figure 4. YAML Frontmatter
---
title: Gettysburg Address
layout: page.html.ejs
publicationDate: January 7, 2025
otherTag: otherValue
tag42: "The Meaning of Life"
---
This is the content area.
The area reading this is the content area is the content body for the document. The part between the lines of three dashes (---) is the frontmatter, and must be in YAML format.
When a document is read, it is first parsed into body (or sometimes docContent) and metadata (or sometimes docMetadata).
The metadata object is available, as discussed earlier, to templates as "variables". The NJK template snippet, {{ publicationDate | escape }}, means to access the metadata variable publicationDate and then apply the escape filter.
Default metadata values in PDF Document Maker
As a convenience, PDF Document Maker supports command-line options for two metadata values:
--titlesupplies the value fortitle, and overrides any existing value--layoutsupplies the value forlayout, and overrides any existing value--publication-datesupplies the value forpublicationDate, and overrides any existing value
The meaning for certain metadata values
Generally the content metadata is simply data with no other defined purpose. It is up to the templates used for processing your documents define the purpose of each metadata value.
Some fields do have defined purposes:
titleserves as the page title, and might be used in the<title>tag as well as in a prominent<h1>tag at the top of the page.layoutnames the layout template to use with this document.publicationDateis a date string (it will be parsed by the Date class) on which the document was published.
CSS styles for print
Most of us use CSS for theming web pages shown in a web browser. We'll create a CSS stylesheet, include it in our web page, and not at all care about the @media tag in CSS.
Using @media we can target some of our CSS declarations for screen display:
Figure 5. CSS for display devices
@media screen and (min-width: 900px) {
    /* ... */
}
This targets regular display screens at least 900px wide.
We might not be aware of the need for specific CSS rules to handle printing. Printed output has different requirements than screen display. To produce a good quality PDF/print document we must take this into account. Doing so starts with this:
Figure 6. CSS for print devices
@media print {
    /* All your print styles go here */
}
What you do is up to you.
To specify stylesheets:
--style <cssFile...>- File names of CSS style sheets--lesscss <lesscssFile...>- File names of LESS files to render to CSS
The --style parameter is used for regular CSS files. These can be stored either in an asset directory or a document directory. When the document is rendered, the CSS files will be copied unmodified into the HTML output directory.
The --lesscss parameter is used for LESS files, which is a format for improved CSS syntax. These files must be stored in a document directory, have an extension of either .less or .css.less, and are rendered from LESS the format to CSS.
In each case the parameter can be repeated multiple times to handle multiple files. The pathname must be a complete VPath with a leading slash.
Using the --style or --lesscss parameter causes a <link> tag to be generated in the <head> section of the document.
Here are links to articles that are useful for understanding CSS for printing:
https://www.sitepoint.com/css-printer-friendly-pages/https://didoesdigital.com/blog/print-styles/https://www.makeuseof.com/format-web-page-for-printer/https://www.smashingmagazine.com/2015/01/designing-for-print-with-css/
Support for https://printedcss.com/ is bundled in PDF Document Maker. It is automatically included in the stylesheet declarations.
If you prefer to disable this, use the --no-printcss option.
Some other frameworks for CSS for printing:
https://github.com/BafS/Gutenberghttps://github.com/vladocar/Hartija---CSS-Print-Framework?tab=readme-ov-filehttps://github.com/cognitom/paper-csshttps://www.getpapercss.com/
For example to use Gutenberg, start by adding it to your project dependencies:
Figure 7. Install Gutenberg CSS
$ npm install gutenberg-css --save
Then create an asset directory:
Figure 8. Create assets directory to hold files
$ mkdir -p assets/vendor/gutenberg
It is good practice to use a directory path /vendor/VENDOR-NAME to store files sourced from a particular project.
Then copy the Gutenberg CSS into that directory:
Figure 9. Copy files into the directory
$ cp -r node_modules/gutenberg-css/dist/ assets/vendor/gutenberg/
And finally, when running PDF Document Maker we add --style vendor/gutenberg/dist/gutenberg.css
Figure 10. Add this directory and stylesheet to config
$ npx pdf-document-maker  \
        --document-dir documents \
        --pdf-output PDF \
        --html-output out \
        --title 'Markdown test document' \
        --asset-dir assets \
        --style vendor/gutenberg/dist/gutenberg.css \
        --format A4 \
        TEST.md
Project configuration with the PDF Document Maker CLI
We discussed earlier that a PDF Document Maker project directory contains the Node.js package.json file where one dependency is @akashacms/pdf-document-maker. The directory must also contain the sort of files mentioned earlier.
Most of the project configuration is handled with command-line options. The --help option will show you the full list of options.
The configuration options cover two broad areas:
- Generating HTML from the input files - These options control generation of the AkashaCMS configuration object
- Generating PDF from the HTML - These options control the Puppeteer configuration
Output directories
Two output directories are created:
| Output | Option | Description |
|---|---|---|
| HTML Output | --html-output |
This directory contains the directory structure of HTML, CSS, JavaScript, and images, which will be rendered into the PDF. The structure is precisely the same as a static website, meaning the files are placed in a directory structure that can be deployed to a regular website. |
| PDF Output | --pdf-output |
This directory contains the PDF file which is generated. |
Header and Footer text in the PDF
A key feature offered by word processing systems like Libre Office is placing text in the margin at the top and bottom of the page. This header and footer text usually carries a date, page number, copyright statement, and document title.
PDF Document Maker supports four options to control headers and footers:
--template-header- A file name for a file containing an HTML snippet describing the text to use in the header--height-header- The height of the header area--template-footer- A file name for a file containing an HTML snippet describing the test to use in the footer--height-footer- The height of the footer area
The template files are HTML snippets where values are injected into HTML elements with specific class names. The class names are from the Puppeteer documentation:
dateformatted print datetitledocument titleurldocument locationpageNumbercurrent page numbertotalPagestotal pages in the document
For example, to output the text Page 2 of 42, use this template:
Figure 11. Page footer template
Page <span class="pageNumber"></span> of <span class="totalPages"></span>
For the <span> with class="pageNumber", the current page number is injected into the content of that HTML element.
An additional thing to know is that the context where the header and footer is rendered has zero CSS settings. It does not inherit the CSS of the main part of the page, and you must initialize any CSS settings required to ensure your header and footer shows up.
Figure 12. Complete page footer template
<div class="text-left"
  style="margin: 0 auto 0 20mm; text-align: left; font-size: 12px;">
    PDF Document Maker Organization
</div>
<div class="text-right"
  style="margin: 0 20mm 0 auto; text-align: right; font-size: 12px;">
    Page <span class="pageNumber"></span>
      of <span class="totalPages"></span>
  </div>
The text-left span has style which glues it to the left hand side of the row, sets the row to 20mm high, and sets the font-size to 12px. The text-right span is the same, but glues itself to the right-hand side of the row.
Figure 13. Command-line parameters for header/footer templates
--template-header header-template.html \
--height-header 20mm \
--template-footer footer-template.html \
--height-footer 20mm
Controlling page layout
As we discussed earlier, the --layout option lets us specify a page layout template.
Layout templates are stored in the Layouts Dirs, which we specify using the --layout-dir option.
Page styling using CSS stylesheets
We can further customize the document presentation using CSS stylesheets. The design allows us to use any number of stylesheets, and to use the LESS format for creating stylesheets.
For each kind of stylesheet we can repeat the option more than once:
Figure 14. Example stylesheet parameters
$ npx pdf-document-maker ... \
    --style assets/style1.css --style assets/style2.css \
    --lesscss assets/style3.less --lesscss assets/style4.less
    ...
The filenames are VPaths. In this example, each of the CSS files are located in the assets virtual directory.
For --style parameters, the file is expected to be in CSS format, and is simply copied into the HTML output directory. These files can be either in an assets directory, or documents directory.
For --lesscss parameters, the file will be rendered using the LESS processor. This means the files must have an extension of .css.less or .less, and be in a documents directory.
Additionally, by default the PrintCSS stylesheet will be used. This is from an open source project, and is CSS for produces good looking print documents. This style-sheet can be disabled using the --no-printcss option.
Additionally, by default the Bootstrap v4 framework is used. For the PDF documents most of Bootstrap is not useful. It has powerful page layout capabilities, and certain components may be useful for creating visual effects. This framework may be disabled with the --no-bootstrap option.
All style-sheets, whether the default print.css file or those specified on the command line, are added to a list. The page layout template is expected to use either of these methods:
Figure 15. Generating stylesheet tags in page layout template
<!-- NJK macro for generating link tags to CSS files -->
{{ ak_core.stylesheets() }}
<!-- a custom HTML tag for the same purpose -->
<ak-stylesheets></ak-stylesheets>
Both of these convert the list of style-sheet references into <link> tags referencing the style-sheets.
Markdown extensions supported by PDF Document Maker
The Markdown ecosystem includes a wide variety of extensions, adding additional features to the language. PDF Document Maker uses the Node.js Markdown IT engine, and can in theory use any of the available plugins. Several are already bundled into the application, with these effects.
Auto-generating "anchor" text for header tags
This extension causes an id="anchor" attribute to be added to the HTML header tag like so:
Figure 16. Example anchor tag generation
## A Markdown H2 tag
<!-- becomes -->
<h2 id="generated anchor">A Markdown H2 tag</h2>
This allows an <a href="#anchor">Link text</a> tag to link directly to the header tag. This would be useful in Tables of Content, where the links would go directly to the section.
This feature can be disabled with --no-md-anchor
Generating footnote blocks
Allows authors to write footnotes.[1] A footnote is referenced with a marker, such as [^1]. The footnote is defined by writing a paragraph like this:
Figure 17. Example footnote
[^1]: This is the body of the footnote.
The extension sets up internal links between the two points.
This feature can be disabled with --no-md-footnote
Adding either id= or class= attributes to HTML
To implement styling using CSS requires the ability to set ID or Class values. Example:
Figure 18. Adding attributes to HTML in Markdown
# header {.style-me}
paragraph {data-toggle=modal}
The stuff between { and } are where we list the attributes to add to the rendered HTML tags after. The above will be converted to:
Figure 19. Generated HTML with new attributes
<h1 class="style-me">header</h1>
<p data-toggle="modal">paragraph</p>
For example, Bootstrap has some text colors available as classes such as .text-primary. One can insert primary text inline in a paragraph using {.text-primary}. It appears there is a bug in that for the attribute to take effect it must be associated with text that has a tag, such as primary, rather than simple text like primary{.text-primary}, which does not have a tag.
Likewise, an entire paragraph can be in the text-success color using a suitable marker.
To fix the bug just described surround some text in brackets which causes the bracketed-spans plugin to add a <span> tag around the bracketed text.
To set class= or id= attributes on a table, place the marker two newlines after the table, like so:
Col 1 | Col 2
------|------
Val 1 | Val 2
Val 1 | Val 2

{#id-table-one .example-table-class}
Which renders as so:
| Col 1 | Col 2 |
|---|---|
| Val 1 | Val 2 |
| Val 1 | Val 2 |
You must inspect the page source to see the class and ID values.
Special treatment is also required for lists.
* This item has the last word in **primary**{.text-primary}
* If the final word is non-bold then this applies to the whole list item{.text-primary}
* This item is completely in secondary {.text-secondary}
Which renders as
- This item has the last word in primary
- If the final word is non-bold then this applies to the whole list item
- This item is completely in secondary
Then, to apply a class to an entire list
* Every item in
* this list is in
* the danger color
{.text-danger}
Which renders as so:
- Every item in
- this list is in
- the danger color
A nested list has special treatment:
* Non-indented list item
* Non-indented list item 2
* Non-indented list items are in "text-success" color
    * Indented list item
    * Indented list item 2
    * These items are in "text-info" color
{.text-info}

{.text-success}
Which renders as so:
- Non-indented list item
- Non-indented list item 2
- Non-indented list items are in "text-success" color
- Indented list item
- Indented list item 2
- These items are in "text-info" color
As with tables, the marker which applies to the entire list follows the list by two lines, whereas the marker for an indented sub-list immediately follows the list.
The extension allows setting other attributes beyond ID and Class. But, most other attributes are potential security vulnerabilities. The extension has been configured to only allow id= and class= attributes.
Use of these attributes should then correspond to entries in CSS stylesheets.
Be aware that the -anchors extension and -attrs extension both deal with the id= value on headers. With -anchors the author is not in control of the choice for the id= value, whereas with the -attrs extension the author chooses the id= value.
This feature can be disabled with --no-md-attrs
Adding a <span> tag around some text
It is sometimes useful to add a <span> tag around some text. Your document may need this to add an id= or class= to a section of text using the attributes marker shown in the previous section.
As discussed in that section, this example does not attach the desired class attribute:
Text with desired primary{.text-primary} attribute.

Other text using [bracketed span to utilize the primary]{.text-primary} attribute.
As noted in the previous section, the attribute does not get attached to text that does not have a tag, as demonstrated by the first line of text. The brackets ([ and ]) around text in the second line causes the bracketed-span extension to add a <span> tag, allowing the attribute to be applied.
The above example renders as so:
Text with desired primary{.text-primary} attribute.
Other text using bracketed span to utilize the primary attribute.
This feature can be disabled with --no-md-bracketed-span.
Simplify adding a <div> block
Another way to customize the resulting HTML is to add <div> tags with certain attributes. For example a box with a yellow background and solid brown border could serve to draw attention to some content. The color effects are easy to define in CSS, and the ability to add a <div> gives the opportunity to wrap a contain some content within a box.
Example:
Figure 20. Adding a <div> to some content
::: #warning
*here be dragons*
:::
Figure 21. That generates the following:
<div id="warning">
<em>here be dragons</em>
</div>
While this is easy to use, one has to consider that Markdown engines like Markdown-IT allow the author to use HTML tags. It's therefore easy to add <div> tags without requiring a Markdown extension.
This feature can be disabled with --no-md-div
Adding <section> tags corresponding to header tags
One may think of a Header tag followed by some content as a "section" of a document. This extension implements that idea with HTML tags.
Figure 22. Implicit sections in Markdown
# Header 1
Text.
### Header 2
Lorem?
## Header 3
Ipsum.
# Last header
Markdown rules!
That's four sections, some of which should be nested within outer sections.
Figure 23. The extension generates explicit <section> tags
<section>
  <h1>Header 1</h1>
  <p>Text.</p>
  <section>
    <h3>Header 2</h3>
    <p>Lorem?</p>
  </section>
  <section>
    <h2>Header 3</h2>
    <p>Ipsum.</p>
  </section>
</section>
<section>
  <h1>Last header</h1>
  <p>Markdown rules!</p>
</section>
If the -attrs extension is enabled, we might have added id= or class= attributes to our headers. If so, these attributes are moved to the <section> surrounding the header.
This feature can be disabled with --no-md-header-section
Adding syntax highlighting to code sections
The HighlightJS package handles syntax coloring for content within code blocks. There are many examples of this all through this document.
Figure 24. At the HTML level the HighlightJS package looks for this:
<pre><code class="html">...</code></pre>
The class name is a language code. The supported languages are listed in their GitHub repository: https://github.com/highlightjs/highlight.js/blob/main/SUPPORTED_LANGUAGES.md
In Markdown a code block is text within two lines of three backticks. The language code is placed immediately after the opening backticks.
This feature can be disabled with --no-md-highlightjs
Convert image references into <figure> tags
This allows rendering an image reference in Markdown as a <figure> tag containing an <img> tag and optionally a <figcaption> tag. This construct is important in modern HTML.
The <figure> element represents self-contained content. The figure, its caption, and its contents are treated by web browsers as a single unit.
Figure 25. Example Markdown image tag

Figure 26. The extension generates this HTML
<figure>
    <img src="fig.png" alt="This is an alt">
    <figcaption>This is a title</figcaption>
</figure>
Figure 27. A Markdown link can be placed around an image tag
[](http://some.where)
Notice that this is structured as so: [...image tag..](URL)
Figure 28. The <a> link is applied to the <img> tag
<figure>
    <a href="http://some.where">
      <img src="fig.png" alt="This is an alt">
    </a>
    <figcaption>This is a title</figcaption>
</figure>
This feature can be disabled with --no-md-image-figure
Special image processing
More advanced image processing is available in the extended <img> tag implemented by AkashaCMS components. This is the normal <img> tag with a few extra attributes and properties. These allow us to specify a <figure>/<figcaption> structure or to resize images.
Adding the figure property triggers a rewrite of the following
Figure 29. We can add a figure property to trigger special processing
<img id="..ID" figure src="..HREF" caption="..CAPTION"/>
Figure 30. It rewrites the <img> into the <figure>/<img> structure
<figure>
    <img id="..ID" src="..HREF">
    <figcaption>..CAPTION</figcaption>
</figure>
The recognized attributes are:
idbecomes theidof the<figure>classbecomes theclassof the<figure>widthbecomes thewidthof the<figure>stylebecomes thestyleof the<figure>destbecomes an<a>tag surrounding the<img>within the<figure>captionbecomes a<figcaption>tag within the<figure>
Figure 31. Larger <img figure> example
<img figure id="fig1" caption="Figure 1."
   class="some-class" width="400" style="CSS declarations"
   dest="http://example.com"
   src="./img/fig1.png"/>
Figure 32. Is rendered to
<figure id="fig1" class="some-class" style="CSS">
  <a href="http://example.org">
    <img src="./img/fig1.png"/>
  </a>
</figure>
This extended <img> tag does more than the -image-figures extension from the previous section.
An image can also be resized when copied to the HTML directory. It allows you to store a full-size image in the documents directory, but use a smaller image when deploying to a website, or in a PDF.
The recognized attributes are:
srcThe file within the documents or assets directories that is copied into the render outputresize-toThe file name used within the render output directoryresize-widthThe resulting image width as discussed above.
This tag
Figure 33. Image resizing
<img id="resizeto150"
        src="img/Human-Skeleton.jpg"
        resize-width="150"
        resize-to="img/Human-Skeleton-150.jpg">
Becomes the following:
Figure 34. Resized image
<img id="resizeto150" src="img/Human-Skeleton-150.jpg">
Additionally, the source file img/Human-Skeleton.jpg is copied to the HTML directory as the destination file img/Human-Skeleton-150.jpg, and is resized to 150 pixels in width.
Multimarkdown table format
Multimarkdown is one of the extended Markdown specifications. This extension supports its table format.
This feature can be disabled with --no-md-multimd-table
Add <caption> tag to a table
We might want to place "Table 1. Global Policy Challenges" either before or after a table, and have it treated as being associated with the table.
Figure 35. Table with caption
Table: A Caption

| A | B |
|---|---|
| 1 | 2 |
| 3 | 4 |
| 5 | 6 |
Renders as:
| A | B |
|---|---|
| 1 | 2 |
| 3 | 4 |
| 5 | 6 |
The effect is to add a <caption> tag within the <table>.
To control the style of the caption, we can add a CSS declaration targeting table captions as so:
Figure 36. CSS to control Table caption styling
table caption {
    caption-side: top;
    font-weight: bold;
    font-style: italic;
    font-size: larger;
}
To demonstrate, we'll create two tables. The first will have the class .table-caption-above, and the second the class {.table-caption-below}. The corresponding CSS is:
Figure 37. CSS to control caption positioning
table.table-caption-above caption {
    caption-side: top;
}
table.table-caption-below caption {
    caption-side: bottom;
}
Next, to construct our table while adding a class attribute:
Figure 38. Adding class specifier to control caption positioning
Table: A Caption Above

| A | B |
|---|---|
| 1 | 2 |
| 3 | 4 |
| 5 | 6 |

{.table-caption-above}
Adding an attribute, like a class, to a table requires that last line is separated from the bottom of the table by one blank line.
The result looks like this:
| A | B |
|---|---|
| 1 | 2 |
| 3 | 4 |
| 5 | 6 |
| A | B |
|---|---|
| 1 | 2 |
| 3 | 4 |
| 5 | 6 |
The important CSS attribute is caption-side, because it control where the caption is shown.
This feature can be disabled with --no-md-table-captions
Bootstrap card groups in Markdown
How did we get those two tables to appear side-by-side?
This page includes the Bootstrap framework. What we did was to create a Card Group containing two Cards.
To generate the required <div> we used the ::: .div-class syntax described earlier. To implement the card group required:
Figure 39. Demonstrating Bootstrap card groups
::: .card-group

::: .card
::: .card-body

CONTENT FOR FIRST CARD GROUP

:::
:::

::: .card
::: .card-body

CONTENT FOR SECOND CARD GROUP

:::
:::

:::
Figure 40. Rendered Bootstrap card groups
<div class="card-group">
  <div class="card">
    <div class="card-body">
      CONTENT FOR FIRST CARD GROUP
    </div>
  </div>
  <div class="card">
    <div class="card-body">
      CONTENT FOR SECOND CARD GROUP
    </div>
  </div>
</div>
Or, this:
Hence, one browses the Bootstrap documentation, or the documentation for your preferred CSS framework, and look at the HTML+CSS structures are required to achieve the desired effect. One then uses ::: to create the <div> portion, and {#id .class-name} to implement the ID or Class attributes.
Diagrams using PlantUML
This is a powerful format for drawing diagrams of importance to software engineers, such as UML diagrams. The feature is discussed later.
This feature can be disabled with --no-md-plantuml
Automating PDF Document Making using package.json
The package.json file can serve as a way to record our build procedure. In this file the scripts section stores commands which can be run. It's useful to create and test prebaked scripts so you don't have to remember how to do things.
It will help to first install npm-run-all because it cleans up the scripts section of package.json.
Figure 41. Installing npm-run-all
$ npm install npm-run-all --save
Then in package.json add these items to the scripts tag:
Figure 42. Build scripts in package.json
"scripts": {
  "build:guide": "npm-run-all build:render",
  "build:render": "npx pdf-document-maker --partial-dir partials --layout-dir layouts --document-dir documents --lesscss guide/style.css.less --pdf-output PDF --html-output out --title 'PDF Document Maker Guide' --format A4 guide/guide.md"
},
Figure 43. Running automated build process
$ npm run build:guide
Project configuration with AkashaCMS configuration files
Under the covers, PDF Document Maker creates an AkashaCMS configuration file. This file instructs AkashaCMS components on where to find input files, and customizations for generating HTML and other files.
One learns about this configuration file at https://akashacms.com There is an example file in the repository.
For most projects using the command-line to auto-generate a configuration object is sufficient. But, some projects may want more control than we can expose with command-line options.
Once you have a config file, add --config configFN to the options.
Drawing diagrams with draw.io, PlantUML, Mermaid, or KaTeX
There are many tools for creating images of all kinds. Images feed our need to have a visual view counterpoint to the text in our documents.
The first three three tools are useful to typical software engineers since they make it easy to create diagrams we use in software engineering and other technical fields. While there are many tools of this nature, these three are easy to use, and easy to integrate with PDF Document Maker.
A fourth tool, KaTeX, is useful for mathematicians, chemists, physicists, engineers, and the like, because of its excellent support for rendering high quality equations.
Using draw.io diagrams in PDF Document Maker
The first, draw.io, is a diagramming tool with a built-in clip art library useful for software engineering, hardware deployment, and other technical fields. It is very easy to use, and with it one can quickly create complex diagrams.
To learn about the application, visit https://www.drawio.com/
To use it online, visit https://draw.io
There is an open-source desktop application, where the GitHub repository is at: https://github.com/jgraph/drawio-desktop However, on drawio.com there is a download link going back to the GitHub repository. And, the desktop application may be available via package management systems. On Linux, it is available via Flathub.
Once you've drawn an image, the best way to proceed is to save the drawing as PNG.
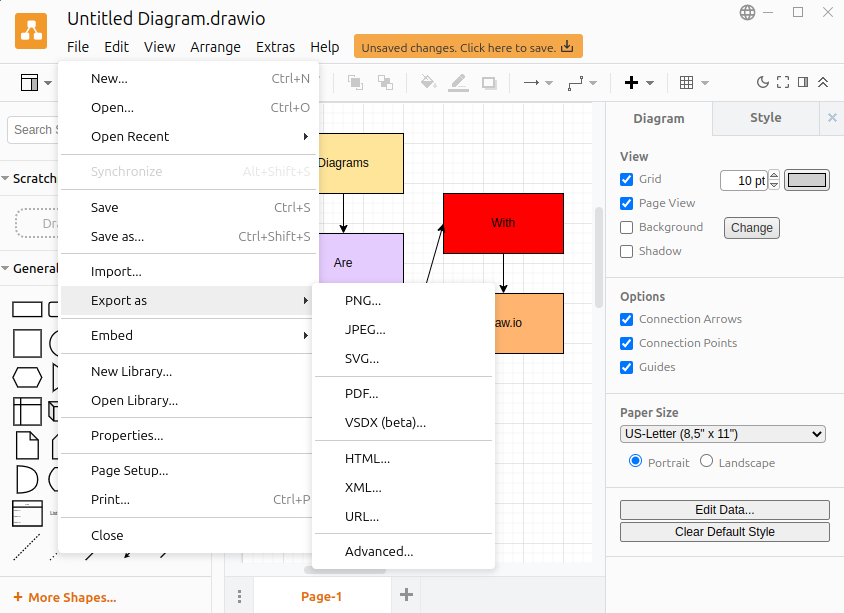
On this screen you choose the export options.
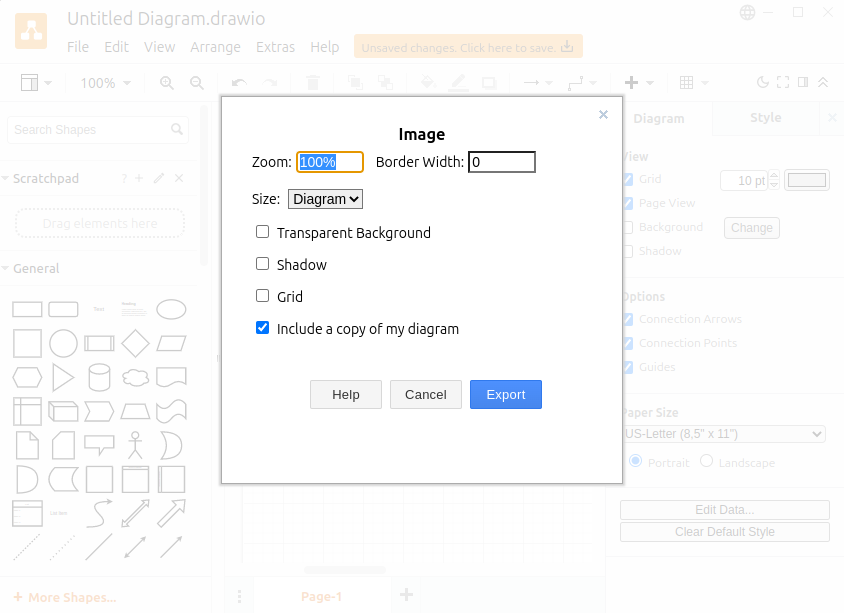
The "include a copy of my diagram" ensures that the PNG can be edited by draw.io in the future. That is, the resulting PNG has information about the drawing such that draw.io can recreate the editing experience.
The diagram is easy to include in Markdown using the normal image tag.
Figure 44. Image tag for draw.io diagram
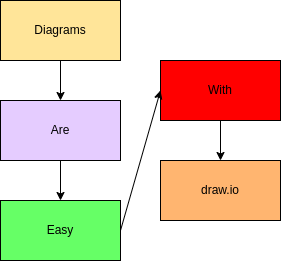
Which results in the following:

If in the future you need to edit the diagram, simply load the PNG file back into draw.io. When done editing the file make sure to save it using the same procedure.
Using PlantUML diagrams in PDF Document Maker
PlantUML - https://plantuml.com/ - is a versatile tool for creating a number of diagrams useful in software engineering and related fields. As the name suggests it focuses mostly on UML diagrams.
With PlantUML you create a textual description of the diagram to create. The description is placed inline with the Markdown file. When the document is rendered to HTML, the description is converted to an SVG representation of the description.
The conversion can be disabled by using the --no-md-plantuml option.
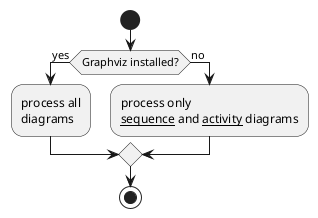
Figure 45. Example PlantUML diagram
@startuml

start

if (Graphviz installed?) then (yes)
  :process all\ndiagrams;
else (no)
  :process only
  __sequence__ and __activity__ diagrams;
endif

stop

@enduml
In PDF Document Maker, we use the custom tag <diagrams-plantuml> to insert a PlantUML diagram.
It looks like this:
Figure 46. Referencing an external PlantUML diagram
<diagrams-plantuml input-file="img/activity-1.puml"
    output-file="activity-1.png" tpng/>
The above diagram, in this case, is saved in the file activity-1.puml in the img subdirectory. The file is read in, and passed to PlantUML for rendering.
That renders as so:
The rendered version is an <img> tag with a src attribute referencing the file named in the output-file attribute.
To render it as SVG replace tpng with tsvg.
Figure 47. Rendering a PlantUML diagram to SVG
<diagrams-plantuml input-file="img/activity-1.puml"
    output-file="activity-1.svg" tsvg/>
That renders as so:

Both tsvg and tpng are properties, not attributes, and they should be used in this way without an attribute value.
Figure 47. An in-line a PlantUML diagram
<diagrams-plantuml
      output-file="activity-1-inline.png" tpng>
@startuml

start

if (Graphviz installed?) then (yes)
  :process all
   diagrams;
else (no)
  :process only
  __sequence__ and __activity__ diagrams;
endif

stop

@enduml
</diagrams-plantuml>
Which renders as so:
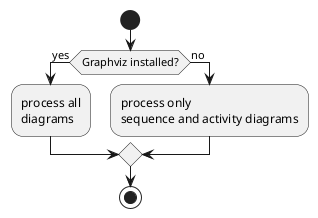
In this case no input-file is given. Instead, the input comes from the element body.
Using MermaidJS diagrams in PDF Document Maker
Mermaid - https://mermaid.js.org/ - is similar to PlantUML. It supports a variety of diagrams, mostly in the UML bailiwick. One creates a textual description o the diagram, pasting it into a Markdown document.
Unlike with PlantUML we were unable to integrate Mermaid such that a code block with the mermaid class would be automatically rendered as an inline SVG.
The most convenient path is to install Mermaid-CLI - https://github.com/mermaid-js/mermaid-cli
In your project directory do this:
Figure 48. Installing the Mermaid CLI tool
$ npm install @mermaid-js/mermaid-cli --save
This installs a program you can run as so:
Figure 49. The Mermaid CLI options
$ npx mmdc --help
Usage: mmdc [options]

Options:
  -V, --version                                   output the version number
  -t, --theme [theme]                             Theme of the chart (choices: "default", "forest", "dark", "neutral",
                                                  default: "default")
  -w, --width [width]                             Width of the page (default: 800)
  -H, --height [height]                           Height of the page (default: 600)
  -i, --input <input>                             Input mermaid file. Files ending in .md will be treated as Markdown
                                                  and all charts (e.g. ```mermaid (...)``` or :::mermaid (...):::)
                                                  will be extracted and generated. Use `-` to read from stdin.
  -o, --output [output]                           Output file. It should be either md, svg, png, pdf or use `-` to
                                                  output to stdout. Optional. Default: input + ".svg"
  -e, --outputFormat [format]                     Output format for the generated image. (choices: "svg", "png",
                                                  "pdf", default: Loaded from the output file extension)
  -b, --backgroundColor [backgroundColor]         Background color for pngs/svgs (not pdfs). Example: transparent,
                                                  red, '#F0F0F0'. (default: "white")
  -c, --configFile [configFile]                   JSON configuration file for mermaid.
  -C, --cssFile [cssFile]                         CSS file for the page.
  -I, --svgId [svgId]                             The id attribute for the SVG element to be rendered.
  -s, --scale [scale]                             Puppeteer scale factor (default: 1)
  -f, --pdfFit                                    Scale PDF to fit chart
  -q, --quiet                                     Suppress log output
  -p --puppeteerConfigFile [puppeteerConfigFile]  JSON configuration file for puppeteer.
  -h, --help                                      display help for command
A sample Mermaid diagram is:
stateDiagram-v2
title: Simple sample

    [*] --> Still
    Still --> [*]

    Still --> Moving
    Moving --> Still
    Moving --> Crash
    Crash --> [*]
This must be saved as a separate file in the file-system. For example, a subdirectory img is a useful place to store images. In that case, save the text in a file ./img/simple-sample-1.mmd.
Figure 50. Rendering a Mermaid diagram with the CLI
npx mmdc -i documents/guide/img/simple-sample-1.mmd \
  -o documents/guide/img/simple-sample-1.svg \
  --outputFormat svg
The -i option specifies the input file, and -o the output file. Hence, this converts to an output file in the same directory the SVG version of the diagram.
The result looks like so:

Let's talk a little about rendering SVG images in HTML. SVG is a vector image format, meaning that an SVG file contains commands for drawing lines and circles and the like. It also means SVG files do not have a defined width/height, unlike pixel image formats. Therefore SVG files can scale to any amount with no pixelation.
Initially, as a result, this image filled an entire page in the PDF file.
One way to give an SVG file a size is by editing the SVG to set width=, height= and other parameters. But the simplest way is to use HTML directly like so:
Figure 51. Using <figure>/<img> with an SVG file
<figure>
  <img width="300px" src="./img/simple-sample-1.svg"/>
  <figcaption>Simple Sample 1</figcaption>
</figure>
This <img> is displaying the SVG, and is defined with a 300 pixel width. The SVG then renders to that size.
Next is to automate building the images before building the document. Earlier we went over using the scripts tag in package.json. Let's add to that workflow.
First, add a command to build each Mermaid file:
Figure 52. Mermaid build procedure
"build:sample-1": "npx mmdc -i documents/guide/simple-sample-1.mmd -o documents/guide/simple-sample-1.svg --outputFormat svg",
"build:guide": "npm-run-all build:sample-1 build:render",
We take the same command, and add it to the script. The tag name format is build:file-name.
The build:guide script contains the complete build procedure.
The resulting SVG file can be referenced from Markdown using:
Figure 53. Using the SVG file in Markdown

This is a normal Markdown image tag which will contain the alt-text Simple Sample 1.
But, if you have multiple files to render it's more efficient to use the Mermaid CLI API in a script like this:
Figure 54. JS Script to build several Mermaid diagrams
import { run } from "@mermaid-js/mermaid-cli"

console.log(".../img/mahabhuta-workflow.mmd");
await run(
   "./documents/guide/img/mahabhuta-workflow.mmd",
   "./documents/guide/img/mahabhuta-workflow.svg",
);

console.log(".../img/pdf-document-workflow.mmd");
await run(
    "./documents/guide/img/pdf-document-workflow.mmd",
    "./documents/guide/img/pdf-document-workflow.svg",
);

console.log(".../img/simple-sample-1.mmd");
await run(
    "./documents/guide/img/simple-sample-1.mmd",
    "./documents/guide/img/simple-sample-1.svg",
);

console.log(".../img/simple-sample-2.mmd");
await run(
    "./documents/guide/img/simple-sample-2.mmd",
    "./documents/guide/img/simple-sample-2.svg",
);
This should save the time required to initialize Puppeteer four times.
Diagnosing a "Failed to launch the browser" failure with Mermaid
The following might happen when you run the Mermaid CLI tool:
./documents/guide/img/mahabhuta-workflow.mmd
Generating single mermaid chart
file:///home/david/Projects/akasharender/pdf-document-construction-set/guide/node_modules/@puppeteer/browsers/lib/esm/launch.js:303
                reject(new Error([
                       ^

Error: Failed to launch the browser process!
[254374:254374:0128/141251.817539:FATAL:zygote_host_impl_linux.cc(128)] No usable sandbox! If you are running on Ubuntu 23.10+ or another Linux distro that has disabled unprivileged user namespaces with AppArmor, see https://chromium.googlesource.com/chromium/src/+/main/docs/security/apparmor-userns-restrictions.md. Otherwise see https://chromium.googlesource.com/chromium/src/+/main/docs/linux/suid_sandbox_development.md for more information on developing with the (older) SUID sandbox. If you want to live dangerously and need an immediate workaround, you can try using --no-sandbox.

TROUBLESHOOTING: https://pptr.dev/troubleshooting
The issue here is that Mermaid uses Puppeteer which in turn uses a Chrome instance for rendering files to PDF, and Chrome's security requires sandboxing its execution.
The Puppeteer troubleshooting page explains what to do. The first presented option is to turn off the sandboxing with the --no-sandbox option. The Mermaid CLI doesn't offer a way to do this, and it's a bad idea anyway.
What does work is to chdir to ~/.cache/puppeteer/chrome/linux-<version>/chrome-linux64/ (notice the version number) and run the commands listed in the troubleshooting guide. This creates a setuid sandbox. Because Chrome is routinely updated, you may have to rerun these commands from time to time.
Also, review the guidance for running Puppeteer in build systems like Travis CI, or in Docker. In some cases PDF Document Maker will be used in an automated build system, which will require some environment preparation as outlined in that documentation.
High quality equation (mathematical and chemical) rendering with KaTeX
KaTeX is a LaTeX/TeX-inspired format for rendering beautiful mathematical equations. Like with PlantUML and Mermaid, the model is to describe math equations in a textual format, which is rendered by KaTeX into the equations written by real mathematicians.
For example, take this
Figure 55. A simple KaTeX expression
\sqrt{3x-1}+(1+x)^2
This is describing the square-root of 3x-1 plus 1+x squared.
In a Markdown document, the KaTeX string is surrounded with dollar signs like so:
Figure 56. Using a KaTeX expression in Markdown
$\sqrt{3x-1}+(1+x)^2$
Which is then rendered this way:
And, the equation can be put in the middle of a sentence,
While simple equations like
Here's some examples of taller equations displayed between paragraphs:
Figure 57. Block-style KaTeX expression examples
$$\begin{gather}
   a=b \\
   e=b+c
\end{gather}$$

$$\begin{CD}
   A @>a>> B \\
@VbVV @AAcA \\
   C @= D
\end{CD}$$

$$\begin{equation}
  \begin{pmatrix}
    A & B \\ B & C
  \end{pmatrix}
\end{equation}$$
Which renders as:
The difference is that the delimiters $ .. $ are for inline equations, while $$ .. $$ are for what's called "block" or "display" rendering.
This also supports the mhchem extension for KaTeX which supports writing chemistry equations:
Figure 58. Example chemical expressions
$\ce{CO2 + C -> 2 CO}$

$\ce{Hg^2+ ->[I-] HgI2 ->[I-] [Hg^{II}I4]^2-}$

$\ce{A -> B}$

$\ce{A ->[H2O] B}$

$\ce{A ->[{text above}][{text below}] B}$
Those are rendered as:
References:
- https://www.npmjs.com/package/markdown-it-texmath
- https://katex.org/
- https://mhchem.github.io/MathJax-mhchem/
This feature can be disabled using the --no-md-katex option.
Custom HTML tags and custom HTML processing
The AkashaCMS [2] contains the Mahabhuta engine [3] which handles custom DOM processing, server-side, using a jQuery-like API. The workflow diagram later includes these steps:

In Mahabhuta, we design individual functions (called Mahafuncs) each of which perform a specific DOM manipulation.
For example, we discussed earlier the custom attributes we can use with <img> tags. Those attributes are processed by a Mahafunc within the AkashaRender package.
Part of an AkashaCMS project configuration can specify the custom DOM processing functions which will be available. The use Mahabhuta for custom DOM processing step means to take the HTML resulting from rendering the document into the layout template, and running every Mahafunc against the HTML.
Most of the Mahafuncs have a jQuery-like selector determining whether to run the Mahafunc. If the selector says to execute the function, its process method is called, and it performs whatever manipulations it is programmed for.
Full Mahabhuta documentation is at: https://akashacms.com/mahabhuta/toc.html
In PDF Document Maker, the --funcs <funcsFN> parameter allows us to supply a JavaScript file containing a Mahafuncarray.
Generating a table of contents, automating section numbering
That discussion of Mahabhuta functions needs a practical demonstration. For that purpose, let's go over a method of adding section numbers to header tags, and creating a Table of Contents from the header tags.
In the Markdown-IT ecosystem, some plugins promise to create a Table of Contents. But they did not work well in testing. Instead the following technique was developed.
The code for this is in the PDF Document Maker website, in the guide directory. The file, mahafuncs.mjs, contains a MahafuncArray containing a Mahafunc named HnNumbering.
In a Node.js module exporting a MahafuncArray, it must have a function like this:
Figure 59. Declaring a Mahabhuta Array
const pluginName = 'PDF-Document-Maker-Guide';

export function mahabhutaArray(options) {
    let ret = new mahabhuta.MahafuncArray(pluginName, options);
    ret.addMahafunc(new HnNumbering());
    return ret;
};
This function is executed from PDF Document Maker. It creates a MahafuncArray, adds instances of Mahafuncs, returning the array. The array is then added into the Configuration.
When the Mahabhuta stage runs, it simply steps through each MahafuncArray, executing every Mahafunc array it contains.
Figure 60. Declaring a Mahabhuta class
class HnNumbering extends mahabhuta.PageProcessor {
	async process($, metadata, dirty) /* : Promise<string> */ {
    // ...
  }
}
The PageProcessor class is for Mahafuncs which can access anything on the page. It does not have the selector function discussed earlier, and therefore this process function will always be executed.
The $ parameter is a jQuery-like $ object. It has most of the jQuery methods, allowing one to search around the page and make manipulations mostly like you'd do with jQuery in a browser.
Because the Mahafuncs are exected after the HTML is rendered, the DOM held by the $ object is what's about to be written as the final HTML. This is our chance to customize that HTML.
This particular function loops over all H1, H2, and H3 tags like so:
Figure 61. Looping over HTML in a Mahabhuta function
$('article').find('h1:not(.header-title), h2, h3').each(function() {
});
What happens inside this loop is a little hairy, but one key part is to add a section number to the H1/2/3 tag like so:
Figure 62. Modifying Hn tags
const title = `${counter_h1}.${counter_h2}.${counter_h3}. ${$(this).text()}`;
$(this).text(title);
That loop also constructs a data structure of the H1/2/3 tags, formatting it into a UL/LI list using this partial template:
Figure 63. Generating the Table of Contents
const toctext = await this.array.options.akasha.partial(
    this.array.options.config,
    'toc.html.njk', {
    headers
});
Once the UL/LI list is constructed, the tag <toc-text-here> is replaced with that list like so:
Figure 64. Inserting the Table of Contents into the document
$('toc-text-here').replaceWith(toctext);
The PDF version of this document you're reading has section numbering, and a table of contents, generated by that function.
PDF Document Maker inner workflow
This diagram may help you understand what's happening.
